How to assign Leads to Members
How to assign leads to Members:
Any leads that come to the leads page can be assigned automatically to the members with the help of three different options that are:
1. Via Project SIze.
2. Via Project Pin Code.
3. Via Alternative Option (Round Robin).
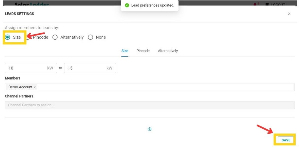
1. Assign Members to leads with Project Size:
Step 1: Click on leads then select the setting option

Step 2: Select Size and then enter the respective sizes of the project.
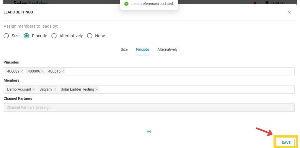
Step 3: Assign a Member by clicking on Members, Select the Member Name you want to assign this lead to, and Click on Save
(For example Projects size from 5KW to 10KW will be automatically assigned under the member name which you have selected, and 10KW to 15KW will be automatically assigned under the member name which you have selected)
2. Assign Members to leads with Project Pincode:
Step 1: Click on Leads in the select setting option

Step 2: Enter the pin code of the project location.

Step 3: Assign a Member by clicking on Members, Select the Member Name you want to assign this lead to, and Click on Save
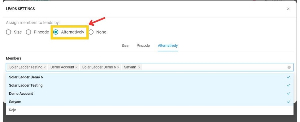
3. Assign Members to leads with Alternative Option:
Step 1: Click on Leads then select the setting option

Step 2: Click on the alternative option.
Step 3: Assign a Member by clicking on Members, Select the Member Name you want to assign this lead to, and Click on Save.
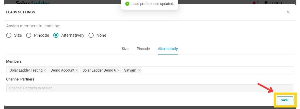
(The leads get assigned to the members in a Round Robin manner where you have to select all the member's name and automatically all the members will be assigned to their leads in the series you have selected their name)
Your Members are successfully assigned to the leads which you have selected for.
Related Articles
How To Add Project Members In A Project
How To Add Project Members In A Project Step 1: Open the Project you want to add a member to and Go to Project Members Step 2: Select the User you want to add from the list of Team Members Step 3: Click on Give User Access and then Press OK New ...How to Edit Customer Information
How to Edit Customer Information Step 1: Open the concerned project Step 2: Go to Edit Customer Tab and make desired changes Step 3: Click on Update Project at the bottom of the page to Save the changesHow To Add A New Project
How To Add A New Project Step 1: Go to Project Dashboard and Click on + Add Project Step 2: Enter Customer Details Step 3: Select the "Project Lane" to which you want to add this project to Step 4: Select the Member you want to Assign the Project to ...How To Create A Task In A Project
How To Create A Task In A Project Step 1: Go to Projects Dashboard and Open the Project you want to Create a Task for Step 2: Open Tasks and Click on Create A Task Step 3: Enter Task Details, Due Date and Assign the Task to either Yourself or Your ...Delete/Archive a Project
How to Delete/Archive a Project Step 1: Go to Projects Tab and Open the project you want to delete Step 2: Go to Archive Tab in the project and Click on "Click Here to Archive this Project" Step 3: Click on OK The project will get archived